Recipes Archive

Blood Orange Fruit Gelatin

Posted March 12, 2011 By Adri

Blood Orange Gelatin


Gather ye rosebuds while ye may,
Old Time is still a-flying:
And this same flower that smiles today
To-morrow will be dying.
…Robert Herrick


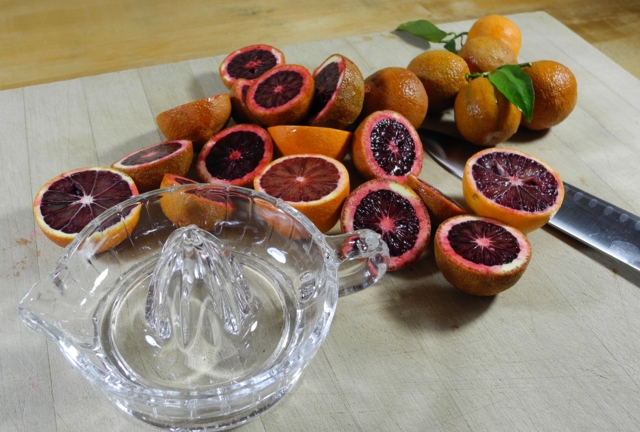
Grab them while you can.  Juice them and freeze their juice.  The season does not last forever, but right now blood oranges are everywhere, including my back yard, so I am using them a lot.  Tarts, panna cotta, cocktails, zabaglione and some very adult gelatin.  I remember eating lots of Jell-O  when I was a kid.  It’s the red flavors I liked best – none of that green stuff for me.  Pass the raspberry, hold the lime.  I can picture holding my mom’s wooden spoon and looking down as I stirred the garnet liquid, knowing that in a while it would transform into its own unique state of matter, somewhere between jiggly and solid, a state that, when  exposed to the heat of my mouth, would return once again to its liquid beginnings.  Magic.   But as always, times and tastes change, and Jell-O was long ago relegated to the realm of childhood memory.  Until Bart was in the hospital, that is.  (To forestall any worry – he is perfectly well now.  No troubles.)  But after many days of no food at all, the angels of mercy presented him with Jell-O.  He loved it.  He devoured it.  He wanted more.  Either the poor guy was really hungry, or that Jell-O was really good.  I will never know.  But when he returned home he wanted some from scratch.  Homemade fruit gelatin.  Not a glamorous name, but that is what it is.  I thought why not?  This could be really good.  We bought some cherry juice and gave it a try.  It was easy to make and we were rewarded with a blast of pure cherry flavor.  More experimentation was surely in order; at each visit to Trader Joe’s we’d scan the juice section for a new flavor to try.  Bart always got to choose, still does.  Along with cherry, some of our favorites are pomegranate, blueberry and cranberry, and now blood orange.  Topped with a dollop of softly whipped cream, homemade fruit gelatin is surprisingly refreshing.  Pure fruit taste.


Blood Oranges


My standard recipe is  2 cups of liquid,  sugar and 1 packet (1/4 oz.) KNOX Unflavored Gelatine.  Don’t be put off by the idea of using gelatin. Once you understand it, you’ll get the hang and you’ll wonder what the fuss was about.  Proper gelatin use consists of two steps.  First you must soften, or “bloom” the gelatin.  To do this pour a small portion of liquid into a small bowl and sprinkle the gelatin over it.  Set aside for 5 minutes.  Do not stir.  Second, pour softened gelatin into hot liquid and stir to dissolve.  See, no hassle.  No mystery. For more info on gelatin use, see my post on Espresso Panna Cotta.


Blood Orange Juice


Depending on the juice you use you may or may not need to add sugar – cranberry and pomegranate always need sugar, from 4 to 6 tablespoons for 2 cups of their very tart juices.  Grape juice may not need any sugar, but remember that you will eat this cold, so a bit of sugar may be necessary to lift the flavor, no matter how perfect the juice seems when you first try it.


I say go for it.  Perfect your fruit gelatin technique in time for summer.  You can wow your guests with unusual flavor combinations and multi-layered delights.


Blood Orange Gelatin
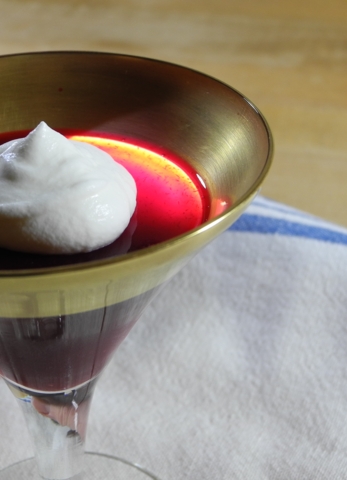
In the fifties every chic hostess used Dorothy Thorpe glassware; in a nod to my mom, the most chic of hostesses and the woman who taught me all about Jell-O, I give you Blood Orange Fruit Gelatin in Dorothy Thorpe glassware.


Blood Orange Fruit Gelatin

makes 4 servingsBlood Orange Gelatin Fixings


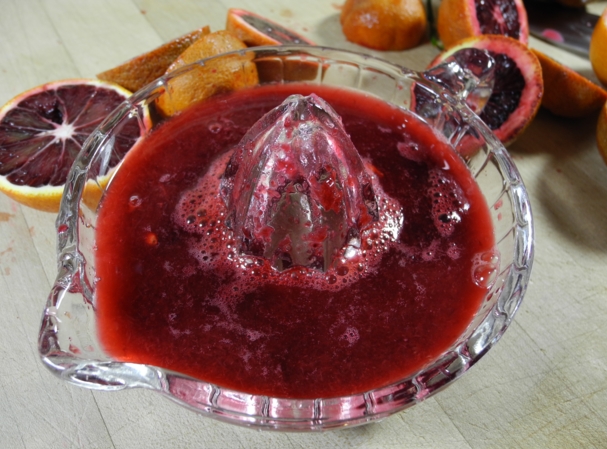
2 cups strained blood orange juice
3-4 tablespoons granulated sugar
1 packet (1/4 oz. or 2 1/4 teaspoons) KNOX Unflavored Gelatine


Pour 1/4 cup juice into a small bowl.  Sprinkle KNOX Gelatine over, and set aside to soften for 5 minutes.  Do not stir.


Pour remaining juice in small saucepan and add sugar to taste.  Bring to a boil over medium heat, stirring to dissolve sugar.  Remove from heat.


Pour softened gelatin into hot liquid, stirring to combine well and dissolve gelatin.  If your juice has cooled, quickly bring it back to the boil, remove from heat and add gelatin mixture, just to be certain it will dissolve.


Pour mixture through a fine strainer set over medium bowl.  Place bowl over an ice water bath to cool, stirring occasionally.


Pour mixture into serving glasses and cover carefully with plastic.  Refrigerate until completely chilled and set.


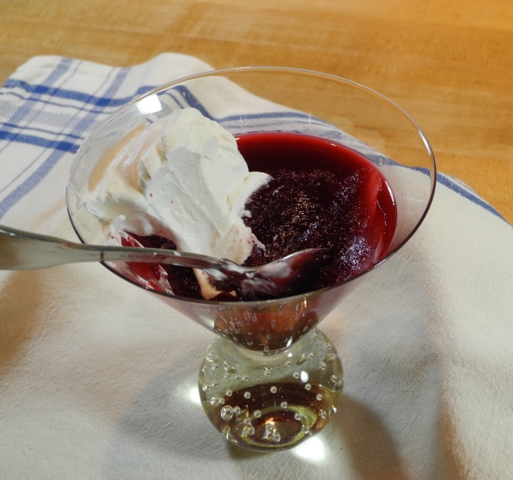
To serve, garnish with a dollop of lightly sweetened whipped cream.


Blood Orange Gelatin

Note: You can click on any picture to see a slide show!

Print Friendly, PDF & Email
1 Comment. Join the Conversation

Blood Orange Panna Cotta

Posted February 9, 2011 By Adri

Blood Oranges


So dramatic. So exotic. Winter in Sicily. Breakfast in the finest hotel. I am talking about blood oranges, Moro blood oranges in particular. Does any citrus make such a statement? This fruit will have you seeing red.


Blood Orange Juice


Cut a Moro open and see brilliant crimson throughout. Juice it and see an opaque liquid as dark as blood. Drink it and experience the marriage of orange with a hint of raspberry over a pedal point of tartness.


Blood Orange Juice


This is orange juice for adults. I figured that the juice, along with being a magnificent drink on its own, would be an unbeatable component in panna cotta. There are several kinds of blood oranges – Moro, Tarocco and Sanguinello being the most common. Although they all ripen in winter, the Moros ripen first and are at their peak right now. You can find them in Farmer’s Markets and many supermarkets these days. Lucky me, I find them in my back yard. I love my blood orange trees, but the Moro is my favorite – especially at this time of year. It is a wildly productive tree and now its branches are heavy with a medium sized fruit. The skin is quite rough and sports an enticing crimson blush. And, thank you Mother Nature, Moros are virtually seedless. If you would like your own blood orange tree, check out Four Winds Growers, a great source for hard to find citrus.


Blood Orange Panna Cotta02

Let’s get to the recipe – for a step by step discussion of Panna Cotta and the proper use of gelatin, take a look at my recipe for Espresso Panna Cotta. You will find lots of explanations and photos there. I cooked up several versions – all cream, cream and milk, more milk than cream – more gelatin – less gelatin. I settled on 1 cup of cream and ½ cup of milk. All cream and the dessert was undeniably voluptuous, but the orange flavor was somehow masked, muted, while the 2 to 1 cream to milk ratio allowed for a pleasant creaminess and a startlingly clean orange flavor. I settled on 1 teaspoon of gelatin to allow for a softer set. If you prefer a firm set, go ahead and increase the gelatin to 1 1/4 teaspoons. This panna cotta is something of a trickster – its dusky rose hue belies a bright clean orange flavor. So get busy, find some Moro blood oranges, or any other variety, and make some Panna Cotta. A word about the choice of oranges. Not all blood oranges are created equal. Moros are much darker than the other varieties, so if you use Sanguinellos or Taroccos, your Panna Cotta will take on a lighter hue. The varieties vary in sweetness, you may have to adjust the sugar.


Blood Orange Panna Cotta


Blood Orange Panna Cotta


makes 4 servings, ½ cup each


1 cup heavy cream
1/2 cup whole milk
1/2 cup blood orange juice, preferably Moro
1/4 cup sugar
1 teaspoon gelatin
fresh berries and mint to garnish


Combine heavy cream, milk and sugar in medium sauce pan. Over medium heat, stir to combine and dissolve the sugar. Heat to scalding. Remove from heat. Meanwhile pour orange juice in small bowl and sprinkle gelatin over it. Set aside for 5 minutes to allow to soften. After gelatin has softened, pour the orange juice mixture into the scalded cream, stirring to combine thoroughly and dissolve gelatin. Pour through a fine strainer into a clean bowl. Place bowl over ice bath, stirring often to cool uniformly. Transfer mixture into serving glasses. Cover with plastic wrap and refrigerate at least 2 hours or overnight, until ready to serve. When ready to serve top panna cotta with fresh berries and mint.


Blood Orange Panna Cotta


Note: You can click on any picture to see a slide show!

Print Friendly, PDF & Email
4 Comments so far. Join the Conversation

Corzetti: Edible Art

Posted January 29, 2011 By Adri

Corzetti Banner


This is Part 1 of a series
For detailed information and photo essays on how to make corzetti, along with recipes, please delve further into
The Corzetti Files:

The Intagliatore of Chiavari, The Corzetti Files – Part 2

Corzetti agli Spinaci con Gorgonzola, The Corzetti Files – Part 3

Where to Buy Corzetti Stamps, The Corzetti Files – Part 4

Corzetti Stampati – and a Giveaway! The Corzetti Files – Part 5


Corzetti CoinWhen I first saw one I knew I had to have one. To those of you who know me – no laughing, no eye rolling, please. This time it was for real. And to those of you who do not know me, my friends are laughing because when ever I see any new kitchen item I say I have to have it. But corzetti stamps and the pasta made with them are in a class by themselves. Read more… »

Print Friendly, PDF & Email
4 Comments so far. Join the Conversation

Ferratelle

Posted January 25, 2011 By Adri

Ferratelle


Especially popular at Christmas, Easter and weddings, ferratelle are a classic Abruzzese treat. In other parts of Italy these delightful waffle cookies are known as pizzelle, nevole, catarrette, cancellette and more, but in Abruzzo where my grandfather Gaetano Crocetti was born they are known as ferratelle. The implements used to make the cookies first appeared in the late eighteenth century and were fashioned of iron, ferro in Italian – and the cookies were dubbed ferratelle. Lu ferro, as the iron is known, consists of two plates, most often rectangular, each attached to a long handle and secured with a locking mechanism. The inside of the plates, the side on which the cookies are baked, is etched with a grate-like design. Some say the name cancellette and the grate-like design were inspired by the screens in nunneries. Dough or batter is placed on one of the plates, the long handle locked closed and the plates held over an open fire. If you come across old ferratelle irons you may see initials, family insignias or names etched on the inside of one of the plates. It was customary for a family to have their own iron, often a prized wedding gift. They are beautiful tools, and after many years of use and thousands of cookies, the irons take on a stunning patina and wonderful non-stick finish, just like nonna’s cast iron frying pan. Should you be lucky enough to have an original etched iron, well then, I am envious. Very envious.

Ferratelle PatternFerratelle IronElectric Ferratelle Iron


Nowadays most families have an electric ferratelle maker. They are sold in the U.S. as pizzelle makers, and they look like small waffle irons. Aluminum irons for stovetop and hearth use are also available. Both electric and stovetop types can be purchased at Amazon and many specialty shops. For an authentic iron you will need to make a trip to an antique store or nonna’s basement or attic.


FerratelleLots of cultures make a cookie like this, the most famous being the Norwegian Krumkake. Of course we are talking about Italy where the tradition of mille nonne is at work – a thousand grandmothers – a thousand recipes, and almost as many names. All ferratelle, or pizzelle, have four ingredients in common – flour, sugar, eggs, and some kind of fat – butter, olive oil, lard, vegetable oil, even margarine. From there the road diverges. The most common flavoring is anise, either ground seeds, oil or extract, and in widely varying amounts. I like just a hint almost more for aroma than taste, but some recipes call for much more. Use what ever amount pleases you, a recipe direction the Italians express as quanto basta, q.b.

Flavorings

I have seen recipes that call for cinnamon, cannella in Italian. Some add vanilla powder or extract, almond oil or extract, lemon or orange zest, oil or extract, or one of my favorites, Fiori di Sicilia. Fiori di Sicilia is a potent mix of orange, vanilla and jasmine, and is available from King Arthur. And since we are talking Abruzzo, source of some of the finest saffron (zafferano) in the entire world, when a cook really wants to splurge she will add some to the mix. For an extra depth of flavor I use brown butter, butter that has been heated to the point where it melts and the milk solids begin to brown. The amazing thing about brown butter is how something so simple to make can have such a complex flavor and add so much to a dish. Whether you put it on eggs, vegetables, fish or add it to a dessert, it brings a unique depth of flavor to any dish. I think of brown butter as a great ingredient that is less than five minutes away; if you’ve got butter, a saucepan and a burner, you’ve got brown butter. But let me emphasize – this step is my addition and in no way traditional, except in my kitchen. Feel free to skip it.

Here is a short clip on how to make brown butter.


These cookies are most often left flat, but they can also be molded right after baking. You can wrap them around cannoli tubes and fill them with whipped cream, pastry cream, Nutella, honey or other filling. You can also form them into cones by wrapping the still hot cookie around a wooden cone mold.

Ferratelle recipes produce every consistency from malleable doughs to loose batters and all points in between. My electric unit produces circular cookies, so I form the dough into balls. If you will be using a hand held iron, either at the stovetop or the hearth, I suggest you use a recipe that will produce a dough-like, or at least a paste-like consistency. The experience will be much more pleasant and much less messy than if you use a batter. And if you are using an iron with rectangular plates, tradition dictates that you form each piece of dough into rope and then into a figure eight to ensure even coverage of the cooking surface. And the cooking time for the hand held irons? Yield to tradition – for the first side say an Ave Maria, give the iron a flip, say a Pater Noster and the cookie is done. I just love Italian food.

Ingredients


Dry Ingredients

In a small bowl combine flour, baking powder and salt. Set aside.


Wet Ingredients

In a medium bowl beat eggs and sugar until light in color.


Add Melted Butter

Add melted butter.


VanillaCollageC

Add Vanilla.


Anise Oil

Add just a drop of Anise Oil.


Combine Well

Combine well.


Fold in Dry Ingredients

Mix Well


Gently fold in flour mixture in three additions.


Dough Ball

Dough will come together in a firm ball.


Form into a Ball

Scoop or pinch off a tablespoon of dough and form into a ball. Repeat with remaining dough.


Baking

Place 1 ball of dough on each plate. Close and lock lid.


Removing

Remove from Iron.


Ferratelle

makes about 30

1 3/4 cup all-purpose flour
1 stick (8 tablespoons) unsalted butter, browned and cooled
1/2 cup granulated sugar
2 large eggs plus 1 large egg yolk
1 packet (una bustina) of Vanillina* OR 1teaspoon vanilla extract
anise oil, q.b.
1 teaspoon baking powder
pinch kosher salt

This recipe will produce a malleable dough. These directions are for an electric unit.

Place a towel beneath the iron to capture any fat that may leak.  Heat iron.

Brown the butter.  Set aside.  Watch my video to learn how to make brown butter, burro nocciola to the Italians.

In a small bowl combine flour, baking powder and salt.  Set aside.
In a medium bowl beat eggs and sugar until light in color.
Add melted butter, vanilla and anise oil.  Combine well.  
Gently fold in flour mixture in three additions.   Dough will come together in a firm ball.
Pinch off a tablespoon of dough and form into a ball.  Repeat with remaining dough.
Place 1 ball of dough on each plate. Close and lock lid.
Bake until steam subsides, about 35 to 40 seconds, depending on your iron and on how brown you want your ferratelle.  Remove to rack to cool.  If you are going to form the ferratelle into cones or tubes, do so when they are hot.

Bake until steam subsides, about 35 to 40 seconds, depending on your iron and on how brown you want your ferratelle. Remove to rack to cool. If you are going to form the ferratelle into cones or tubes, do so when they are hot.

* I like to use Vanillina Pura, a vanilla powder manufactured by Fratelli Rebecchi. It is available at many Italian markets, and online at Amazon.

Ferratelle


Note: You can click on any picture to see a slide show!

I have no affiliation with any product, manufacturer, or site mentioned in this article.

Print Friendly, PDF & Email
13 Comments so far. Join the Conversation

Nutella Thumbprint Cookies

Posted January 9, 2011 By Adri


Nutella Thumbprint Cookies


Another Nutella recipe, this one for Thumbprint cookies. Thumbprint cookies are easy to make, and every family has a favorite recipe. I figured why not Nutella Thumbprints? Once I had decided to make them, the rest came together quickly. Instead of the usual walnuts, I rolled the unbaked cookies in chopped and toasted hazelnuts. Then I piped a dollop of Nutella in the center of the baked cookies instead of the traditional jam. Finito. Make these for the Nutella fans in your house. They will thank you. Remember – save the seal on the Nutella and redeem cool Nutella stuff!


Nutella Jar


Nutella Thumbprint Cookies


yield: about 2 ½ dozen


1 cup hazelnuts

1 cup flour

½ teaspoon kosher salt

1/4 cup light brown sugar, firmly packed

½ cup unsalted butter, room temperature

1 teaspoon vanilla

1 large egg, separated

Nutella


Preheat oven to 325 degrees. Place hazelnuts on rimmed baking sheet and toast 10 to 12 minutes, until fragrant, stirring twice. Remove nuts from oven, place in a kitchen towel, and rub nuts together to remove skins. Chop finely and set aside.

Increase oven temperature to 350 degrees. Place flour and salt in bowl of KitchenAid mixer fitted with paddle. Combine briefly. Add brown sugar, butter, vanilla and egg yolk. Beat one minute to combine.

In a small bowl lightly beat egg white. Place chopped hazelnuts on a sheet of parchment paper or in a pie plate. Shape dough into 3/4 inch balls. Dip balls into egg whites and then roll in nuts to cover. Place on ungreased cookie sheets 1 inch apart. Make an indentation in the center of each cookie with your thumb.

Bake 15 minutes, until golden. Check cookies at halfway point, and if center depression has risen, press down again. Be careful! Remove cookies to a wire rack to cool. When cookies have cooled, pipe a dollop of Nutella in the center of each cookie. The Nutella will remain soft, so store these cookies in one layer.


Hazel Nuts


Note: You can click on any picture to see a slide show!

Print Friendly, PDF & Email
2 Comments so far. Join the Conversation

Nutella Coffee Cake

Posted January 5, 2011 By Adri

Nutella Coffee Cake Slice


I like Nutella. I really like sweet yeast risen coffee cakes, the kind with a dough like brioche. And the other day I was craving a sweet coffee cake. Can you guess what’s coming? Just in time for Little Christmas, it’s Nutella Coffee Cake, of course. Nutella, that delicious concoction of hazelnuts and cocoa seems to go with just about everything in the bakery department. Developed during World War II by Pietro Ferrero, it was originally supplied in a foil wrapped loaf called pasta gianduja. Over time the formulation was changed to the spread we know today and it became known as supercrema gianduja. And in 1964 the name was changed to Nutella. It has been sold in the United States since 1983, and in recent years it has become extremely popular. With good reason, I’d say. I think of it as the Italian answer to peanut butter. Check out the Nutella USA web site and enter the Nutella Monthly Case Sweepstakes to win a case of Nutella. Oh, one thing more, when you open a jar of Nutella don’t throw away the gold seal. Collect them to use to redeem cool Nutella stuff like tee shirts, mugs and more. Really. I mean how good does life get?


Nutella


Many cultures have sweetened filled yeast breads; Italians have their nut filled Gubana from Friuli, Eastern Europeans have Babka typically filled with nuts and dried fruit while Jewish bakers fill their Babka with chocolate or cinnamon and crown it with streusel. Now I have Nutella Coffee Cake, a sumptuous brioche-like concoction filled with Nutella, rolled up, twisted, plopped in a pan, topped with streusel and baked to tender yeasty sweet-filled perfection.


I started with a sweet brioche-like yeast dough, rolled it out in 2 batches, just to make it easier to put it in the pan, spread each piece of dough with half a jar of Nutella, rolled them up jelly roll style, gave them a twist and put them in a tube pan. I figured that although I was craving something sweet, maybe, just maybe the Nutella along with the sweet dough would be too much. So I opted for buttermilk, just to give the dough a bit of a tang to counteract all that sweetness. Then I got to thinking I needed maybe just a little something more than the dough and the Nutella, something more on top perhaps. The idea of a streusel sounded darn good to me. I went with it. Once the dough was in the pan, I spread some butter on top and sprinkled it with a streusel of sugar, flour, butter and, in a nod to the Nutella, toasted hazelnuts. This is for those who are serious about their Coffee Cake.


Nutella Coffee Cake


For those of you who do not make yeast breads, fear not. Do not be daunted by the thought of working with yeast. I use SAF Instant Yeast, a baker’s dream. No dissolving, no worrying about the temperature of your liquids and no proofing. Just mix it in with the dry ingredients and you are ready to go. SAF Gold Instant Yeast is particularly good for use in sweet breads. Baked goods with lots of sugar can take forever to rise. Why? The sugar attracts the water and the yeast can not get any. Thirsty yeast will rise slowly. The yeast in SAF Gold needs less water, thus no conflict in your dough, only peace, harmony and a most remarkable rise. You will love it. You may not find it on your grocer’s shelf, however it is available from the King Arthur Baker’s Catalogue, along with just about every other cool item for baking.


I have called for 00 flour because I love the soft, tender dough I get when I use it. If you do not have it, you will still get a wonderful result with all-purpose flour. For more info on 00 flour, see my post on Crostoli.


A word about the hazelnuts – you will need to toast and skin them. Toasting brings out their wonderful flavor and allows you to skin them with some degree of ease. To toast the nuts, place them on a rimmed baking sheet in a 325 degree oven for ten to twelve minutes, stirring the nuts once or twice. Remove them from the oven, place them in a kitchen towel and rub them vigorously to remove as much of the skins as you can. You will never be able to remove all of the skins, and that is alright. Toasting and skinning is an important step because if left on, the skins will impart a bitter flavor to your final product.


I like to use a 2 piece non-stick angel food cake pan for this coffee cake. Even though I direct you to line your pan with parchment paper, the added benefit of a non-stick pan makes it that much easier to remove the coffee cake. If you are not familiar with yeast breads and rolled coffee cakes, this might all seem like a bit of a challenge, but press on. Your efforts will be rewarded and after you have made it once you will wonder what all the fuss was about. A nice thing about this recipe is you can do the second rise in the refrigerator overnight. You can even make the streusel days ahead and keep it in the freezer until you are ready to use it.


When you assemble this coffee cake you may find that the ends of the dough do not meet, especially with the second piece of dough that will lay around the outside of the pan. Do not worry. Do not fuss. Just place the dough pieces in the pan so that the ends of one piece are on the opposite sides of the pan from the ends of the first piece. The dough will rise sumptuously, you will have luscious pockets of Nutella, and your Coffee Cake will have character.


I hope you try this Coffee Cake. It is just as good the day after as it is the day you make it. Do not think of this as a lot of work, but rather several steps. And since all you have to do for the filling is open a jar of Nutella, it is almost easy. (I have to be careful saying a recipe is easy. My sister Toni never believes me.) Try this one. It’s great for breakfast or brunch, and it is just in time for Little Christmas. I bet that like me, you will leave your fork on the table and pick it apart with your hands.


Nutella Coffee Cake

Nutella Coffee Cake


Nutella Coffee Cake


makes one large 10 inch coffee cake


For the dough:
2 3/4 cups 00 flour
1/3 cup sugar
2 1/2 teaspoons instant yeast
1/2 teaspoon kosher salt
1/2 cup buttermilk, at room temperature
2 whole eggs
1 egg yolk
1 teaspoon vanilla extract
4 ounces (1 stick) unsalted butter, very soft, cut into 16 pieces
2 tablespoons unsalted butter

extra butter for bowl and pan
flour for dusting work surface

For the streusel topping:
1/2 cup 00 flour
1/3 cup hazelnuts, toasted and skinned, about 2 ounces
1/4 cup granulated sugar
4 tablespoons unsalted butter, diced and chilled

For the filling:
1 13-ounce jar Nutella

To make the dough: combine flour, sugar, instant yeast and salt in mixer fitted with paddle attachment and mix briefly to combine. With mixer on low, add buttermilk, whole eggs, egg yolk and vanilla. Beat until dough comes together. Remove paddle and switch to the dough hook. Beat medium-low until dough is shiny and elastic, about 10 to 12 minutes.

Add one stick of the softened butter, piece by piece, blending completely after addition. Beat on low for about 5 minutes, until dough is smooth and elastic. Place dough in buttered bowl. Cover with plastic wrap and set aside in a warm, draft-free area. Let rise until doubled, about 2 hours.

When dough has doubled in size, remove plastic. Press dough down. Cover tightly and refrigerate at least 2 hours or overnight.

To make streusel topping: place flour, hazelnuts and sugar in bowl of food processor fitted with steel blade. Pulse briefly to coarsely chop nuts. Add butter and pulse briefly to form a crumbly mixture. Place streusel in freezer until ready to use.

Butter the bottom and sides of a 10″ angel food cake or tube pan, preferably with a removable bottom. Line bottom and sides of pan with parchment paper. Butter parchment paper.

Divide refrigerated dough in half. On a lightly floured surface, roll one half of the dough into a 13 x 8-inch rectangle. Use an offset spatula to gently spread half the Nutella over the rolled out dough to within 1/4 inch of the edges. Trim edges. Beginning at long end, roll up tightly as for jelly roll; pinch seam to seal. Holding one end of the roll in each hand, carefully twist the roll several times to make a spiral. Nestle dough in prepared pan, wrapping dough around central core, leaving ends loose. Repeat with the remaining dough and Nutella; place second roll in prepared pan, arranging it around the outer perimeter along side the first roll with the ends of the second roll on opposite sides of the pan from the ends of the first. The coffee cake will rise a bit unevenly. Don’t worry. I don’t. And by leaving the ends loose you will get some terrific pockets of Nutella in your finished Coffee Cake.

Melt remaining 2 tablespoons butter and brush it over the dough. (If your butter is very soft, you can spread it over the dough.) Sprinkle streusel mixture on top of dough. Cover with plastic wrap and let rise about 2 hours, until doubled in size.

Preheat oven to 350 degrees. Place tube pan on a baking sheet and bake in center of oven about 45 to 50 minutes, until a cake tester inserted in the center of comes out clean. Cool pan on a wire rack for at least 30 minutes before removing coffee cake from the pan and serving.


Note: You can click on any picture to see a slide show!

Print Friendly, PDF & Email
7 Comments so far. Join the Conversation
Content Protected