Recipes Archive

Crostoli

Posted September 19, 2010 By Adri


A plate of finished crostoli All Rights Reserved © AdriBarrCrocetti.com


Dino Martin Crocetti and William Crocetti. All Rights Reserved © AdriBarrCrocetti.com

Dino and William - The Crocetti Brothers

“Mamma, Che buona!” My father William Anthony Crocetti, born Guglielmo, did not speak English until he went to grade school. So I have no doubt that was what he exclaimed every time he ate the crostoli his mother made in her kitchen at 319 South Sixth Street in their south end neighborhood of Steubenville, Ohio. I wasn’t there, but those were his words. Senza dubito. And I bet Dino echoed his big brother.


Italians have been making these treats for hundreds of years. A recipe even appears in Pellegrino Artusi’s seminal cookbook, L’Arte di Mangiar Bene (The Art of Eating Well), first published in 1891. Although these delightful pastry knots are the prototypical Carnevale indulgence, they are also served at Christmas, New Year’s and Easter. This type of dolci is called nastri delle suore (nun’s ribbons), but that would never do for Italy, a country whose inhabitants identify themselves by regional ties first and as Italians second. Twenty regions – more than twenty names. These treats are called galani or frittelle alla Venezia in Venice and the Veneto, crostoli in Friuli, cenci (rags and tatters) or donzelli (young ladies) in Tuscany, frappe in Umbria, sfrappole or lattughe (lettuces) in Emilia-Romagna, chiacchiere (gossips) in Lombardy, chiacchiere di suore (nun’s gossips) in Parma, bugie (lies) in Piemonte and gigi in Sicily. Da vero. Call them what you will, they are fried dough, and I love fried dough. Like my father, I grew up eating these deep fried delights.

Where I grew up. All Rights Reserved ©Toni Crocetti

...

Spring-o-lators

...


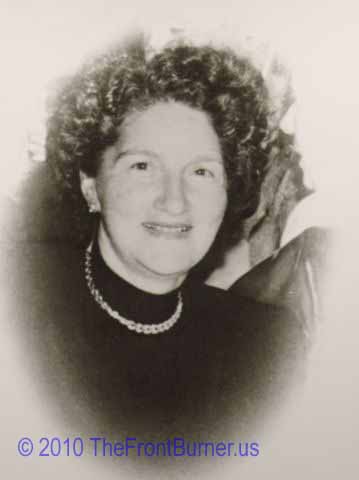
We called my grandmother Mom, and no typical nonna was she. When she arrived at our home I could always tell if she had a treat for us; instead of exiting her car and making her way directly up our driveway she went first to her passenger door, opened it and removed a long flat box. Then up our driveway she walked, box in hand, the clack-clack-clack of her Spring-o-lator shoes announcing her approach. We never knew what she had in that box, but we always knew it would be good. We four kids, my brothers Guy and Marc and my sister Toni and I, loved the cookies and we gobbled them up. My mother could always tell who had done most of the gobbling – the powdered sugar on the guilty party’s hands, face and chest was a dead giveaway. In fact that is how these cookies got their Piemontese name, bugie – liar’s cookies – as in “No Mamma. It wasn’t me, no mamma. I don’t know who ate the cookies…” Another of this cookie’s colorful names is chiacchiere or gossips. Some say the name came from the ladies of Lombard and the nuns of Parma who ate them as they gossiped. Still another source tells us the name originated with the sound the knots make when dropped in the cooking oil – “Pssst !” – just like the town gossip as she summons her listeners. Great stories all, which ever is true.


This cookie has a variation for every nonna. Some call for grappa, others get their alcohol kick from Gran Marnier, vin santo, white wine or rum while a few eschew spirits altogether. In Tuscany they are often made with olive oil in place of butter, and some regions use lard or shortening. Some use orange in place of lemon or no citrus at all. For the finishing touch, some cooks use confectioner’s sugar while others choose cinnamon sugar. As to the shape, some are plain ribbons, some are formed into pretzel-like shapes while others are twisted and pinched in the middle. You will also find flat squares or rectangles, some with one or two slits along the middle. This is the tradition of Italy’s beloved nonne at work, the tradition of variation on a theme that makes this cuisine so inviting, so forgiving, and so much fun.


Flour in Italy is classified by how finely it is milled, either 1, 0 or 00. Doppio zero is the most finely milled and feels like talcum powder. Do not confuse how finely ground the flour is with its protein content. Any strength flour can be ground into doppio zero. Just as we have pastry flour, all-purpose flour and bread flour with their varying protein contents, so do the Italians. They just have the added luxury of varying degrees of milling. To see the full range of flours available to the Italian cook go to the Molino Caputo website. I use a doppio zero flour that is comparable in protein content to our American all-purpose flour. Doppio zero flour is available at Italian markets and Amazon. com. If you can not find it, regular all-purpose flour will do nicely. Use the same amount the recipe calls for.


Mom made her dough by hand in the traditional manner – mounding her flour on a wooden board, making a “well” in the center, filling it with the ingredients and incorporating them with a fork. In a concession to the age of the mechanized kitchen I use my KitchenAid.


This dough is a dream to work with. Do not be intimidated by the idea of rolling it very thinly. You will be able to do so with great ease. Honest. On the subject of frying oil – Mom used solid Crisco, and there is no reason to change that. But if you have something else on hand, peanut oil, vegetable oil, feel free to make use of what is in your pantry. Mom drained the cookies on brown grocery bags. Some cooks use paper towels. I have found that placing the fried cookies directly on a cooling rack suspended over a sheet pan works very well.


A note about these cookies: they fry up very quickly, so be sure to have everything you need close at the ready. Banish the kids and pets from the kitchen. You will be working with a large volume of very hot oil.


And finally, do not overcook the crostoli. If you do you will not taste the grappa!

As the Italians say “Divertiti!” Have fun!


Ingredients for crostoli

Here is what you need. Don't be daunted. Just follow step by step. They will come out perfectly!


Weighing flour

Weigh your flour for the most accurate measurement.


Flour in mixer bowl

Put flour in mixer bowl.


Add the sugar

Add sugar.


Add salt

Add salt.


Add lemon zest

Add lemon zest. I use a microplaner grater. It works beautifully.


Dry ingredients

Your dry ingredients are ready to go.


Turn on the mixer

Turn on the mixer briefly to combine.


Add butter

Add butter.


Lightly beat egg

Lightly beat egg.


Add egg

Add egg and combine.


Add vanilla

Add vanilla.


Add grappa

Add grappa and combine.


Add milk

Add milk and combine until dough comes together.


Check out dough

Stop mixer. Pinch off a piece of dough. It should be slightly moist, not sticky, a cohesive mass.


Remove dough

Remove dough from mixer.


Knead a few times

Knead a few times.


Shape dough

Shape into a disk and wrap in plastic.


Roll the dough

You are now ready to roll the dough.


Cut dough in half

Cut dough in half and keep the half you are not using covered.


Flour your board

Flour your board and get to it with your rolling pin.


Lift and turn your dough

Lift and turn your dough to prevent sticking.


Roll dough out to 1/16th inch

Roll dough out to 1/16th inch. Yes, you can!


Trim edges of dough

Trim edges of dough and measure to cut ribbons 6 inches long and 1 inch wide.


Use a rotella (ravioli cutter)

Use a rotella (ravioli cutter) to cut ribbons.


Forming knots

-1-

Forming knots

-2-


Forming knots

-3-

Forming knots

-4-


Forming knots

-5-

Forming knots

Finished!


Form knots and place on a floured tea towel.


Heat oil to 350

Heat oil to 350 degrees in a heavy deep-sided pan.


Drop knots in oil and fry

Drop knots in oil and fry a few at a time.


Fry until golden

Fry until golden. They will puff up enticingly.


Remove to a rack to drain

Remove to a rack to drain.


Ready to sugar

To keep things neat, place your tray and rack on a large piece of parchment. Have ready a bowl of confectioner's sugar and a small strainer.


Dust with powdered sugar

While still warm dust with powdered sugar.


Mom would be proud

Lovely. Mom would be proud. Maybe she'd even say, "Brava, piccina!"


Crostoli


makes about 3 ½ dozen


200 grams 00 flour (This should measure 1 ½ cups when lightly spooned into measuring cups, then leveled with a flat edge.)

1 tablespoon granulated sugar

zest of 1 lemon

generous pinch salt

1 large egg, lightly beaten

1 tablespoon unsalted butter, at room temperature

1 tablespoon grappa

1 teaspoon vanilla extract

3 to 4 tablespoons whole milk

shortening or oil for frying

confectioner’s sugar


In a mixer bowl fitted with paddle attachment, combine the flour, sugar, lemon zest and salt. With mixer running add egg, butter, grappa and vanilla. Gradually add 3 ½ tablespoons of milk to form a soft malleable dough. Remove dough from bowl, pat into a disk. Wrap in plastic, and set aside to rest for 1 hour.

Line a sheet pan or tray with a tea towel. Lightly dust the towel with flour. Set aside. Divide dough in 2 pieces, keeping the one you are not using wrapped in plastic or covered with a towel. On a lightly floured board, roll out dough as thinly as you can, about 1/16-inch thickness; dough should be almost translucent. Using a ravioli cutter cut dough to form ribbons 6 inches long and 1 inch wide. Tie a knot in the center of each ribbon, and place on the towel-lined pan in a single layer. Keep the knots covered as you work.

Meanwhile heat a generous amount of oil to 350 degrees in a heavy deep-sided pan. A candy thermometer placed on the side of your pan assures correct cooking temperature. Have ready a rack placed over a sheet pan. Fry the knots, a few at a time, until they color, about 20 to 30 seconds. Remove with a slotted spoon, spider or metal tongs, and place on rack to drain. Sprinkle liberally with confectioner’s sugar. Crostoli are best eaten the day they are made.


Solo Crostoli All Rights Reserved © AdriBarrCrocetti.com


Note: You can click on any picture to see a slide show!

Print Friendly, PDF & Email
10 Comments so far. Join the Conversation

The LA County Fair

Posted September 4, 2010 By Adri


LA County Fair

Home Arts Building c. 1980


“Calling all chefs, bakers, and food lovers… join your fellow culinary artists in one of the many contests and competitions offered this year at the L.A. County Fair!” That’s what it says on the L.A. County Fair website Culinary Styles Contests and Competitions page. I read the article about the Fair in Thursday’s Los Angeles Times and the memories came flooding back. Years ago I was an avid L.A. County Fair Home Arts competitor with lots of laughs, photographs and Winner’s Ribbons of all stripe to show for it. I entered jams, jellies, preserves, candy, breads, specialty bread… you name it. I even entered a Cheesecake Contest. And who could forget the Baker’s Chocolate Brownie Contest? It was a ton of fun. Back in the day the food contests were held under the auspices of the Home Arts Section. In early Spring all contestants registered by mail with the Home Arts Division to enter the contests of their choosing, and the reward far outweighed the minimal entry fee. While some contests are judged live at the Fair, most are judged prior to the Opening Day. Contestants deliver their entries to the Pomona Fairplex several weeks prior to the opening of the Fair for closed judging. Let me tell you, it is hard to leave those babies and wonder what folks will think of them. I always wanted to tell the ladies something about them. I always wondered on the drive home what would become of my creations. Opening Day arrived, and it was time to go.


Read more… »

Print Friendly, PDF & Email
4 Comments so far. Join the Conversation

Tomato Jam

Posted September 1, 2010 By Adri


Tomato Jam

Crostini with Ricotta and Tomato Jam


Well, I walked out into my garden yesterday morning and I started picking Juliet tomatoes. And I picked. And I picked. By the time I finished I was astounded at the morning’s yield from one plant. And in just a couple of minutes. Astounded, I say. There were four and one-half pounds! First off I reflected on how pleased I was with the yield from my one very productive Juliet plant. Then I got practical. I thought about what I was going to do with them. Ovoid, red, firm and juicy, they are one of my favorite tomatoes. I could eat them out of hand. I could make my favorite eggs for breakfast, Cheesy Eggs, that is. See my older post on the subject. I could share them with neighbors. Or I could do what any cook does in August when faced with abbondanza such as this. Make jam. Yes, indeed. Tomato jam. If you have never had it, stay with me. Tomato jam is sweet, the very essence of tomato. Over the years I have seen many recipes. Some call for nothing more than tomatoes and sugar. Others call for the addition of citrus juice and or zest, red wine vinegar, cinnamon, cumin, chiles de arbol, jalapenos, cloves, ginger, bay leaves, and that is just for starters. Remembering a post about Sicilian Tomato Jam from Judy of Divina Cucina and another from Deborah of Italian Food Forever, I got to work. One thing I love about cooking is looking at another’s work and building upon it. So here with sincere thanks to both Judy and Deborah is my version of Tomato Jam.

Read more… »

Print Friendly, PDF & Email
4 Comments so far. Join the Conversation

Mom’s Sauce

Posted August 21, 2010 By Adri


Angela Barra Crocetti. All Rights Reserved © AdriBarrCrocetti.com

Angela Barra Crocetti


We called her Mom. Her full name was Angela Barra Crocetti. She was my paternal grandmother, and woe betide the individual who addressed her as such. It was Mom. Period. And her husband, Gaetano, well, we called him Pop. That’s just the way it was. Mom was born in Fernwood, Ohio in 1898. My grandfather, Gaetano Crocetti was born in 1894. He left his home town of Montesilvano in the region of Abruzzo, Italy and traveled to Naples in 1913. From there he boarded the Hamburg to sail to the United States of America, arriving at Ellis Island in September. Sponsored by his brothers, he went to live in Steubenville, Ohio, and in 1914 he married Angela Barra. Their firstborn, Guglielmo (William), my father, came into this world in 1916. And his brother Dino followed one year later. Mom was a terrific cook and a terrific grandmother. Uh oh, there’s that word again. She came to visit us, it seems, every day. I remember her driving up in her white Cadillac carrying an impossibly huge buff leather pocketbook. Now that was the treasure chest.
Read more… »

Print Friendly, PDF & Email
Be the first to comment

Happy Birthday Julia!

Posted August 6, 2010 By Adri
Creme Renversee au Caramel

...


Julia Child’s birthday is August 15, but I just had to get a head start to let you all know so you could plan your own Julia feast to honor her. Aside from the chef at Dino’s Lodge who used to make me giant cones of matchstick potatoes, my first out-of-the family food influence was Julia Child. I remember my dad encouraging me to come and sit in the living room with him as he waited for her show to come on the air. He thoroughly enjoyed her show and encouraged me to do the same, a man ahead of his time. I think he may have had an ulterior motive, though. He often drew my attention to how gracefully and with what ease she navigated any culinary mishap. He prompted me to notice that she never took herself too seriously; when things went awry, she was able to roll with it and make the best of it. Life lesson, I think. I have been accused of being too “picky,” too “fussy,” too much of a “perfectionist,” “too hard on myself,” well you get the picture. My dad had my number, and in his wonderfully easygoing dad way figured out how to help the kid loosen up a bit. Thanks, Dad.


Today’s post, a tribute to Julia Child, is Crème Renversée au Caramel, a milk custard thickened with eggs and baked in a caramel lined mold. The custard is turned out of the mold onto a serving plate and winds up being served upside down. That’s the renversée part. A sweet river of caramel flows over the custard and envelopes the dessert. This is my favorite custard dessert. It is lighter than creme brulee and more sophisticated than an American baked custard. For all its elegance it is pretty simple to make. Line a mold with caramel. Scald some milk and then whisk it into eggs and sugar. Pour it into the caramel lined mold and bake in a water bath. Chill and unmold. That’s all there is. Really. Oh, except for that satisfying “plop” when the creme caramel releases from its mold and slips onto the serving plate. You can make this classic dessert. Practice a couple of times if you are nervous. It will never go to waste. It is sublime and oh so satisfying at 3:00 am, and also great for breakfast. But you didn’t hear that from me. For the complete recipe I direct you to your copy of Mrs. Child’s masterwork Mastering the Art of French Cooking Volume 1 page 610. One thing though, caramel is fiercely hot. When you are working with it get the kids and the pets out of the kitchen.


I was prompted to post this entry when I saw Cooking Channel’s call to food bloggers to honor Julia for her birthday. I am happy to participate. I had the opportunity to meet La Grande Dame one afternoon in Santa Barbara. I said to her what so many thousands said to her over the years. “It is a pleasure to meet you. I just can not tell you what an influence you have been on me.” Corny? No. Honest? Yes. Sincere? Darn straight. She was gracious, kind and engaging and gave so freely of her time. What a great lady she was. And what an honor it was to have met her.

I have no affiliation with any product, manufacturer, or site mentioned in this article.

Print Friendly, PDF & Email
Be the first to comment

Espresso Panna Cotta

Posted July 30, 2010 By Adri


Espresso Panna Cotta

...


The French have Creme Brulée.  The Italians have Panna Cotta.  Creme Brulee is thickened with eggs.  Panna cotta is thickened with gelatin.  Both are creamy.  Both are delicious.  Today’s post is Italy’s answer to the French.  And I think it is a great answer.

Panna Cotta can be made with lots of different dairy products – milk, cream, yogurt, buttermilk, sour cream, creme fraiche, pretty much anything you can think of.  It is often flavored, always sweetened and always includes gelatin.  My Espresso Panna Cotta is made with milk and cream, sweetened with sugar, flavored with espresso beans and set with gelatin.  Classic.


Unflavored Gelatin

...


A few words about Fear of Gelatin.  If you were born after the ascendancy of JELL-O you have it.  We all have it.  In 1950  JELL-O began a heavy advertising campaign, and they really took America by storm.  Housewives everywhere were looking for shortcuts, and Jell-O was a sure bet.  The homemade fruit gelatins my mom grew up with all but disappeared.  At about the same time menu items such as Tomato Aspic and gelées in general fell very much out of vogue.  Use of gelatin decreased overall.  For lots of us our main gelatin memory is that we drank it in hopes of growing long, strong beautiful nails.   But when you make this Espresso Panna Cotta, you will conquer your fear.  Really.  My sister always gives me grief when I say a recipe is easy.  But this one is.

So, about gelatin.  It is made from the collagen found in beef and pork.  It is an animal product.  Vegetarians out there, beware.  For those following a kosher diet, kosher gelatin is available, but not all gelatins are created equal.  While unflavored gelatin can be found sold in bulk, the product most supermarkets sell is KNOX Unflavored Gelatine, and it is supplied in boxes containing individual packets.  Each packet contains 1/4 ounce of gelatin, an amount just shy of 2 1/2 teaspoons.  If your recipe calls for anything other than a packet of gelatin, you must measure.

I have made many Espresso Panna Cotta recipes that call for instant espresso.  They are really good, and they are pretty quick, but if you are looking for a depth of round coffee flavor, go for the beans.  And the beans you use are important.  Use a good full flavored fruity espresso bean.  I used Oro Blanco Tazzo D’Oro, from Guidi Marcello in Santa Monica, California or Amazon.com.


Crushed Coffee Beans

...


To infuse the cream with the coffee flavor you must first coarsely crush the beans.  I said crush, not grind.  Use a hammer, a meat mallet, a skillet or what ever grabs your fancy.  Put the beans in a plastic bag (that way you can see how much you have crushed them) and get to it.


Beans and Cream Infusion

...


Next, place the cream, beans and sugar into a saucepan, stir to dissolve the sugar and heat until small bubbles form around the edge of the pan.  This technique is called scalding.  Please note I did not say “Boil the cream.”  If you go beyond the scald and arrive at the boil your next stop is the dreaded boil over and its attendant mess.  You will wind up with cream all over your stovetop.  Some of it will scorch and stick to your stovetop, and you will have quite a clean up job on your hands.  Do keep a good eye on your saucepan.  You have been warned.  Once you have scalded the cream mixture, remove the pan from the heat, cover and let the mixture steep for  20 minutes.


Sprinkle the Gelatin

...


After 15 minutes pour the milk into a small bowl and sprinkle the gelatin over it to soften, also called blooming.  Do not stir.


Gelatin Landscape

...


The softened gelatin will look like a relief map of a very blond landscape, all rolling hills.  This is what you want.  Things are progressing well.


All Togehter Now

...


After the gelatin has softened for 5 minutes (we are at 20 minutes total now) pour it into the cream and stir to combine and dissolve the gelatin.  (If you are concerned about the gelatin not melting,  heat the cream mixture briefly before you add the gelatin to insure the cream is hot enough.)


Ice Bowl Setup

...


Prepare an ice bath.  For this you need two bowls, one larger than the other.  Fill the larger bowl half full with ice water.


Filtering Out the Beans

...


Strain the mixture into the smaller of the two bowls.


Cooling

...


Set the bowl containing the panna cotta  into the bowl containing the ice water and stir occasionally until it is cool, about 15 minutes, taking care that no ice water gets into the panna cotta.  This will cool the panna cotta to allow for a smooth and uniform set.

Don’t discard the crushed coffee beans!  They are an excellent high nitrogen mulch for your tomatoes.  Waste not.  Want not.


Into the Bodum

...


Once your panna cotta is cool, pour into serving containers and refrigerate until you are ready to serve.  It will take several hours to set up.  I suggest making it in the morning, or even the day before.  This is such an ethereal dessert, and I love to see how my guests savor each bite.  I can tell when people like dessert.  Table conversation stops.  That makes me smile.  You will too.


Finished

...


Espresso Panna Cotta

makes 4 servings


Espresso Panna Cotta1 1/2 cups heavy cream

1/3 cup espresso beans, coarsely crushed

3 tablespoons granulated sugar

1/2 cup whole milk

1 1/4 teaspoons gelatin


Combine cream, espresso beans and sugar in a saucepan.  Stir until sugar is dissolved.  Heat over medium heat until scalding.  Remove pan from heat, stir and cover.  Steep for 20 minutes.


After the cream mixture has steeped for 15 minutes pour milk into a small bowl and sprinkle gelatin over it.  Allow gelatin to soften for 5 minutes.


After the gelatin has softened pour the milk and gelatin mixture into the cream mixture, stirring until smooth and gelatin is completely dissolved.  Pour through a fine strainer set over a bowl.  Place bowl in a water bath to cool, about 15 minutes, stirring occasionally.


Pour cream mixture into 4 serving glasses and cover carefully with plastic wrap.  Refrigerate until completely chilled.


To serve, garnish with white or dark chocolate shavings or chocolate covered espresso beans.


Note: You can click on any picture for a larger image, and to see a slide show!

I have no affiliation with any product, manufacturer, or site mentioned in this article.

Print Friendly, PDF & Email
2 Comments so far. Join the Conversation
Content Protected